
by Loren K. Woodard
wdcarver@lakeozarks.net
(ps: my home page is under construction)
"Notes from the Net" is a column that F. Pierce Pratt has labored over and posted to the WWWoodcarver E-zine so meticulously over the last couple of years. Feeling that it was now time for someone else to take over the task, Mr. Pratt ask Bill Judt to find a replacement for him. Bill posted a message to the Woodcarver Mailing List and I was the first to answer so I have been given the task. I will do my best to do the job in as good a manner as that done by Mr. Pratt. Further, I would like to take this opportunity to thank Mr. Pierce for the excellent effort he has put forth over the last couple of years. As Mr. Pratt stated in his articles, If you have a favorite post or subject that would like to have posted in my articles, please email me directly at wdcarver@lakeozarks.net.
With this being my first article, I have developed a newfound respect for the work Mr. Pratt did on this column in the past. It has been a fairly monumental task trying to keep tabs on all of the messages coming into the Woodcarver Mailing List and trying to determine what would be of general interest to all who read these pages. So that you will have a better knowledge of who I am, I would like to submit a short synopsis about myself.
My name is Loren Woodard, I just turned the "BIG 50" and make my home at the Lake of the Ozarks. I started carving in late 1991 and have carved a variety of different types of carvings over the last several years. I started out carving Native American sculpture and still do a considerable number of these types of carvings. I have added other characters out of the old west to my carving portfolio including cowboys, mountain men, etc. I carve quite a number of Santa Clauses throughout the year. Many of my friends and carving customers feel that Santa Clause is one of my better subjects. This might be true, as I really enjoy doing this type of carving. Others subjects that I have an interest in include caricatures, animals, fist and most recently wildfowl carving.
I'm a member of the Lake of the Ozarks Woodcarving Club, The North Arkansas Woodcarvers, Inc., The Tri-County Whittlers and Wood Carvers, The National Association of Woodcarvers and the Woodcarvers Mailing List. I have taught carvings classes through two local art shops, the lake area Vocational school and at the Hobby Lobby store in Springfield, MO. Again, I would like to invite all to send me an email if there are certain items posted to the "list" that you would like to see in future "Notes From The Net".
Due to the large number of new carvers finding the Woodcarvers List Serve, other great woodcarving pages on the World Wide Web, and the discussions that have taken place on the Woodcarvers Mailing List over the last month or so, the first topic that I will cover is that of tool sharpening.
First off, let me share a couple of web sites that I feel will go a long way in helping carvers delve into the ever expanding world of tool sharpening.
Michael D. Parker - KnifeCut@aol.com - has a 15 page article in the Worldwide Woodcarver Ezine. The article can be found at http://www.wwwoodcarver.com/WWWEzine/HelpFiles/SharpeningMessages.html
The article consists of archived E-mail that was gathered from the Woodcarvers Mailing List. Since this is the case, there are many different techniques to be studied here.
Another site that offers worthwhile reading was posted on the Woodcarver Mailing List by Joe Brott. Look for the sharpening information at http://www.mv.com/ipusers/gunterman/SCARY.HTM
This is an eight page article that covers the use of sandpaper in varying grits for sharpening. The site basically talks about sharpening hand planes but the data can be used for carving tools as well.
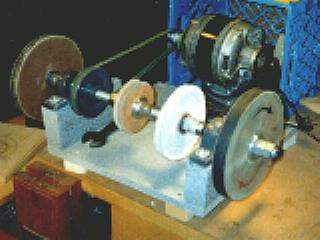
Finally, Bob Gallandt submitted information to the Woodcarver Mailing List concerning a Five-Wheel sharpening machine that he had built to aid in his sharpening endeavors.
Bob stated that the machine had two 8 inch (1 inch wide) cardboard wheels, two 4 inch leather wheels and a 6 inch felt wheel. He built his machine at slightly less than $100.00. However, he had a 1,725 RPM motor with a belt that he used.
Bob's sharpening machine is 24 inches overall. It is constructed on a 2 x 4 frame which is mounted on a piece of 16" x 16" x 1" plywood. I have seen different variations of this type of mechanical sharpening machine every since I started carving.
My machine is a steel frame system that I bought back in 1992. It originally had two wheels covered with two different grades of sandpaper, a leather wheel and a felt wheel. Later, I purchased a second set of 4" paper wheels for it. Now my machine has a total of nine different wheels. I mention this only to show that you can take Bob's basic machine and with some ingenuity, change its design to fit you own basic needs. As a matter of fact, I very seldom use the small paper wheels.
Bob asked me to tell you that he built the machine and it works well for him. However, he is not a mechanical engineer and does not warrant the machine. With that said, I received permission for Bob to download a photograph of his machine to include with this article.
After Bob had built his machine, he posted a note to the "list" asking for help in determining the speed that his arbor shaft was turning at. He had a 1.5 " pulley belted to a 4" pulley. We, the readers of the Woodcarvers Mailing List, found out that there are several different ways to calculate the speed of the arbor. In my opinion, Robert Taylor posted the easiest calculation as follows:
(1.5*1725)/4=646.875 RPM.
Jim Davies offered the following formula:
(Dia of motor pulley x 3.14) / (dia of driven pulley x 3.14) x speed of motor.
Finally, Ron Wiener posted the following to the Woodcarvers Mailing List concerning sharpening:
For those of you that would like to use your new found sharpening skills, Will Sharp writes:
Now that we have talked about sharpening and tools lets take a look at the woods available to carvers. You must realize that there are many different types of woods available throughout the different regions of the country and world, as a whole. Ask the question, what is the best wood to carve and the answers will be very different, depending on what you carve. One thing that I can almost assure you is that a knowledgeable carver will mention basswood early on and will tell you that tupelo is generally carved with power carvers. With that thought in mind lets take a look at some of the information presented in the Woodcarvers Mailing List.
James F. Scott posted information to the Woodcarver Mailing List discussing the various types of wood and their carving properties. Mr. Scott stated that he generally carved wood that had been given to him. He generally uses the following wood for carving in the round: Cherry, flowering cherry, myrtle, birch, pear - apple - and plum fruit wood, walnut, black walnut, hawthorn, alder, cottonwood, and various types of pine.
Mike Parker had submitted the following: For in-the-round
carving Mike suggested Tupelo, Basswood, Jelutong, Butternut,
Yellow Cedar, and Myrtle. Mike stated that Tupelo should only
be used for power carving.
He rated the wood as follows for in-the-round carving:
Basswood (best-but must buy)
Weeping Willow (cannot buy but readily available)
American White Pine (very soft - tools must be very sharp)
Butternut (difficult to find, has a tendency to split)
American Black Willow (not as good as Weeping Willow - not available
commercially)
American Black Cherry (hard but takes detail well and stains beautifully)
American Sugar Maple (very hard, takes excellent detail)
American Black Walnut (does not take fine detail as well and very
costly)
Beech (very, very hard, takes detail, hard to find)
Poplar (nice wood but heartwood is yuk green).
The mail further indicated that Tupelo is the best thing since sliced bread if you are a power carver. The writer indicated that he could carve it almost as thin as paper and it remained strong and resilient. He further indicated that Tupelo hates knives and chisels. But Vic Kirkman tells us of a knife made specifically for carving Tupelo. For details on the knife visit Vics web pages at http://www.mindspring.com/~kirkman and check out the Resources page.
Susanna wrote that Maple was one of her favorite woods for relief carving. She stated that she loved the density, strength and color. She did state that it was a little heavy for large carvings.
Gale B. wrote that Maple isnt all that hard, was relatively easy to carve, and holds detail real well.
Will Sharp wrote: For the beginning carver, wood selection
is simple: basswood
black walnut
white pine
tupelo.
Basswood and white pine for chip carvers, basswood and white pine for bird carvers, basswood, black walnut, and white pine for relief and carvings in the round. Tupelo for decoy carvers. White pine and sugar pine is also good for decoy carvers. The reason that this list is short is simple: All of these woods will hold detail, carve relatively easy, and are generally inexpensive. Also, they are readily available. Tupelo is the choice of power carvers because it doesnt fuzz like some other woods.
Once we progress we begin to do original carvings. Now the selection of wood becomes much more complex. We must consider what we see in our minds eye. Do not select high grain wood if you are doing high detail. The grain will distract from the details. Do not select basswood, white pine or Tupelo if you plan to use a natural or oil finish. These wood are white and not very pleasing to the eye.
For woodcarvers there are many choices. Fruit wood of all kinds, citrus woods, and the so-called "nut" woods. Apple, cherry, plum, and pear make excellent carving woods as does lemon, lime and orange. For the real serious carver the nut woods are excellent (black walnut, butternut, and oak are included here). For those of us that do realistic or character carving, bass wood and walnut are the standards.
For carving in the round: Aspen, basswood, black cherry, cottonwood, poplar, walnut, white pine, Hounduras mahogany, apple, pear, cherry, lemon, lime, or orange.
For chip carving: Aspen, basswood, butternut, poplar, and white pine.
For relief carving and lettering: Aspen, basswood, beech, birch, butternut, cherry, chestnut, cottonwood, elm, mahogany, maple, oak, pine, poplar, and black walnut.
For wildlife carving: Basswood, white pine and tupelo.
For architectural carving: Cedar, cherry, pine, redwood, butternut, oak and black walnut. A tip for those of you that gather your own wood: Hardwoods usually drop their leaves in the winter and softwoods do not.
Robyn Edward Trudel writes:
Basswood is this the wood of choice by most carving artisans?
My victim of choice is the Eastern White Pine. The woods color varies from milky white to almond to yellow to nearly pink. The grain is usually not very pronounced, but depending on the soil conditions some have very striking grain.
The wood is usually softer than basswood, but you do not have the problems with crumbling the way you do with some basswood. Get it air-dried if you can. I live near a mill and get some pieces so green that the wood spits at me when I carve it! Carving green is nice-smelling and very fast, but the tools get gummed up quickly and need to get touched by the buffing wheel to get cleaned up.
Paul Ward writes: BTW, just happened to be doing some Father Xmases. Small pieces of eastern white pine, old and dry. Must have been in my shop for years. They carve like butter. When this native New England white pine gets old the surface turns orange, hence it is called pumpkin pine. Great carving wood.
Bob Gander writes: I just learned a wood hardening technique from turning friend. Take a long setting two part epoxy and mix it half and half (roughly) with acetone. This thins out the epoxy enough so that it can soak into spongy, spalted wood. The spongier the wood the deeper the penetration. I have tried it this past week on 4 walking sticks (diamond willow, of course!) that were badly spalted--one to the point of being quite rotten. On the good wood the epoxy basically sits on top, but on the rotted wood I got enough penetration to successfully work the pieces. It makes the treated wood considerably harder to carve and sand than normal willow in good condition.
The epoxy I used was the type that takes 12 to 24 hours to set; it is normally used for pouring over table tops for restaurants. Mixed roughly 50-50, it was thinner than any of the oils that I use. The results are at least as good as what I have achieved with Minwax wood hardener (which isn't readily available in these parts) and better than using cyanoacrylate glue (crazy glue) and no really noxious fumes that comes with using large amounts of CA glue. I also tried thinning it with lacquer thinner (because I was out of acetone) and that worked also. My lacquer thinner contains ethanol and isobutanol, so methyl hydrate (methanol) might also work. That would be cheaper than acetone, and somewhat less noxious.
For those wanting to air-dry wood Ainslie Pyne writes:
Briefly, the best way to season your logs is to rip them down through the middle in order to ease the "stresses" as soon as possible which will set in once the logs start to lose moisture content. This loss occurs from the ends faster than from the circumference of the logs therefore the shrinkage is greater through the diameter and it is this that causes the radiating checking one sees in the end section of a cut log if not treated.
Paint the sawn ends with a waterproof glue, oil paint, or proprietary end grain sealer to further reduce the rapid moisture losses and store up off the ground away from direct sunlight - it is not so important to have the wood protected from wind as this would help with the drying too.
With logs less than four inches one might get away without having to rip down through the lengths - but over this it is wisest to saw them.
Many good books on woodcarving and wood turning will give a chapter in the first part of the book on how to season found timber.
There is another option whereby you could consider carving the wood while it is still green down to almost the finished piece - this would be further reducing the amount of timber to be dried - and then put it away to season. (Many carving shops, that do large log sculpture, carve green logs, split the wood down the center of the back of the carving with a chain saw, and put it away to dry for a year or two. At that time they will come back to the carving, fill the cracked and sawed areas with glued chips (saved from the carving) and complete the carving. The cracked and glued areas are nearly invisible if done right, when the carving is finished. Look closely at most Cigar Store Indians done from a log.)
If carving any piece from a large block and having to leave it for a day while between carving sessions, it is highly recommended that you cover it with an old blanket which will "mask" the work against drafts of air which might cause end grain cracking of parts of your carving.
I paint a solution on the end grain areas of my large sculptures whenever I finish at the end of the day or when I am leaving the studio for a half day or so - this doesn't penetrate far into the surface but it makes a great difference to how much cracking could occur in my absence. I cover the whole carving with a cloth - not plastic as this draws too much moisture.
Ainslie also states that: A weak solution of PVA glue will also serve as an end grain sealer but I am not so sure this is waterproof if leaving the timber outside anywhere to season.
If you have made it this far I feel very honored. I trust that my efforts will improve with time. If you have any suggestions that you feel would help to make this column more valuable to carvers as a whole or more enjoyable to read please do not hesitate to drop me an e-mail at wdcarver@lakeozarks.net. I appreciate and accept constructive criticism.
With these thoughts in mind I will leave you with a poem that was written and posted on the Woodcarver Mailing List by Don Burgdorf. Although by the time this article is published in the World Wide Woodcarver Ezine, it will be slightly dated, it was my opinion that it bears re-peating.
For information regarding the various email lists for woodcarvers, visit The Carvers' Companion Links Page, or click the links below.