![]()
THIS HAS BEEN PREPARED WITH THE HOPE THAT IT WILL BE A HELP FOR ANYONE INTERESTED IN CARVING FACES IN BARK.
1. INTRODUCTION:
 The
bark that I use is collected from dead standing Balsam Poplar
or Cottonwood trees. It is not easy to peel the bark off living
trees, also the bark usually can not be carved very easily and
the tree may die before its time. So why not let nature do a lot
of work for a bark carver. When collecting bark, I usually find
that the top of a good bark tree has been blown off long ago and
the wood inside the bark may be soft and in various stages of
decomposition. Doesn't this somehow indicate that the bark is
less prone to rotting than the wood? This is true as the bark
in a living tree protects the living wood from all sorts of bacteria.
The bark will eventually fall to the ground and if you are lucky
you might be able to collect this recycled carving material from
the ground.
The
bark that I use is collected from dead standing Balsam Poplar
or Cottonwood trees. It is not easy to peel the bark off living
trees, also the bark usually can not be carved very easily and
the tree may die before its time. So why not let nature do a lot
of work for a bark carver. When collecting bark, I usually find
that the top of a good bark tree has been blown off long ago and
the wood inside the bark may be soft and in various stages of
decomposition. Doesn't this somehow indicate that the bark is
less prone to rotting than the wood? This is true as the bark
in a living tree protects the living wood from all sorts of bacteria.
The bark will eventually fall to the ground and if you are lucky
you might be able to collect this recycled carving material from
the ground.
Balsam Poplar is commonly called Black Poplar and the scientific name is Populus balsamifera. Cottonwood's scientific name is Populus sargentii. These trees can be found throughout North America in forestland, old burns, cut blocks, and especially on sandy bottomlands near river and stream banks.
I have found that the thickest bark , comes from trees which have been growing close to water courses. In my early days of bark collecting I used to bring home every piece of bark that I found, but not every piece of bark can be carved, some are too brittle, some too spongy and wet, and some too dirty. I now take some time to test the carving quality before hauling any bark out to my vehicle. I will sit on a stump if one is handy and try some carving. This way I usually bring home only worthwhile carving bark.
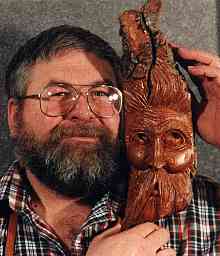
This style of carving faces in bark is not a new one. Carving of wood spirits or wizards dates back hundreds of years, some say back to the middle ages or before. The tradition that goes with them is that if you have a wood spirit hanging in your home all the bad spirits stay away.
A nice thing about this style of carving is that there are no definite and precise patterns that the carver has to follow. Instead of definite patterns we have a general method and techniques that work. Each piece of bark is different size and shape, the carver develops the skill to sculpt the carving to fit the bark.
My method of bark carving evolved from reading a book by Master Carver Harold Enlow (Carving Faces In Driftwood) and then a lot of trial and error on my own. There are no mistakes in bark carvings, just circumstances that sometimes happen, with the carver learning to adapt to these circumstances. There are some carvers that say they can see the finished work in the raw bark even before they start carving. Do you think that they may be "BARKING UP THE WRONG TREE"??
Anyhow, I have found that bark carving can be one of the most enjoyable types of carving to try. The following pictures and notes may help you in starting this enjoyable art form.
![]()
2. TOOLS:
I have carved faces in bark using only one whittling knife. I think that most of the cuts a carver makes with all the gouges can be almost duplicated with a whittling knife. The resulting carving certainly is harder to do and takes a lot longer that if a carver uses some good specialized carving chisels.
 The
tools I used for this carving are shown in the picture. There
are many other tools in this world that will work but these are
the ones I used and are indeed the ones I refer to in the carving
instructions.
The
tools I used for this carving are shown in the picture. There
are many other tools in this world that will work but these are
the ones I used and are indeed the ones I refer to in the carving
instructions.
A brief list is:
1. Wire brush2. Home made whittling knife3. Austrian Carver's Hook4. Home made bark drill ( heck, this is just a 1/4" bit glued into a wood handle)5. Flex cut carving tools;Set FR404, wide format palm - includes 3 sweep gouges at 5/8", a #3, #5, and #8 - also includes a 3/8" V tool at 70 degrees6.Two other Flex cut tools; - a 1/8" #11, u gouge - a 1/8" V tool at 70 degrees7. Sanding block, sponge type; fine and medium8. HB pencil
I am almost in love with the new Flex cut tools, they are light comfortable, sharp and stay sharp for a long time. Since I got these I have not used any of my other carving chisels.
![]()
3. BARK PREPARATION
 The picture to your left is an example of a piece of bark that
has been ripped off a dead tree. This piece is 14'' long about
4.5" at it's widest and about 3.5" thick. The inside
of the bark ( or the back of the bark) generally has some fibrous
remains, old inner bark, sticking to it. Note that the front is
cracked and mottled looking. Under this may be some interesting
grain. The first step is to get this bark ready for carving. Clean
off the dust and other debris that may be on the front of the
piece and the stringy tissue from the back of the bark. Use a
wire brush for this little joyful chore.
The picture to your left is an example of a piece of bark that
has been ripped off a dead tree. This piece is 14'' long about
4.5" at it's widest and about 3.5" thick. The inside
of the bark ( or the back of the bark) generally has some fibrous
remains, old inner bark, sticking to it. Note that the front is
cracked and mottled looking. Under this may be some interesting
grain. The first step is to get this bark ready for carving. Clean
off the dust and other debris that may be on the front of the
piece and the stringy tissue from the back of the bark. Use a
wire brush for this little joyful chore.
Smooth the back as flat as you can.
I use an old jointer to smooth the piece. If you decide to carve
a wall hanging, this flatness makes it easy to hang on a nail
on the wall. Decide which is top and bottom and drill a hole near
the top, at a slight upward angle, and in the middle of the back.
This will fit over the large finishing nail you have just partially
hammered into the wall. Put your bark on the nail on the wall
and step back to look at it. Do you see any faces hiding there?
![]()
4. LET'S GET CARVING.
Use the Austrian Carver's Hook,
carve off some of the rough bark on the front of the piece. Try
 to leave a definite
peak running down the middle area of the piece. If you think of
looking at the peak of a house you may get a better idea of what
I mean. When the carving is finished the top of the peak will
be close to the tip of the nose. (picture #2,right)
to leave a definite
peak running down the middle area of the piece. If you think of
looking at the peak of a house you may get a better idea of what
I mean. When the carving is finished the top of the peak will
be close to the tip of the nose. (picture #2,right)
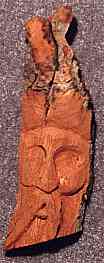
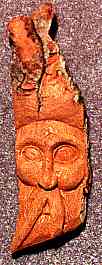
You don't need to be able to draw
well to do a credible wood spirit. Look at the lines drawn on
picture #3 (left). I used a felt pen so you could see the face
squiggle I drew. May be you might want to  practice sketching this squiggle on paper
before applying it to the bark. After the surplus bark is removed
from the front of your carving and you are down to the good carving
bark, get out your HB pencil and draw some curved lines to represent
the areas of the forehead, nose, mustache, cheek, and eyebrow
areas. Make the nose much bigger than you think you need to.
practice sketching this squiggle on paper
before applying it to the bark. After the surplus bark is removed
from the front of your carving and you are down to the good carving
bark, get out your HB pencil and draw some curved lines to represent
the areas of the forehead, nose, mustache, cheek, and eyebrow
areas. Make the nose much bigger than you think you need to.

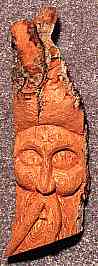
On to picture # 4, (right). Use the larger V tool and carve a
groove over the face squiggle.

 Pictures #'s 5, 6, 7 illustrate the next steps. Roughing out the
brow, eye cavities, nose and cheeks, the number 3 and 5 gouges
work great for this. A bottom lip is also added. A carving knife
can be used to chip out the mouth, this is initially just a three
sided chip carving style cut. Take a look at faces around you
or even your own in a mirror. Don't they all have at least one
thing in common? The nose sticks out from the rest of the face,
Carve it so that it does. So many many carved faces are too flat,
try to get some depth to the face, the eye cavities are really
quite deep, the cheeks, mouth and mustache are much farther back
than the tip of the nose.
Pictures #'s 5, 6, 7 illustrate the next steps. Roughing out the
brow, eye cavities, nose and cheeks, the number 3 and 5 gouges
work great for this. A bottom lip is also added. A carving knife
can be used to chip out the mouth, this is initially just a three
sided chip carving style cut. Take a look at faces around you
or even your own in a mirror. Don't they all have at least one
thing in common? The nose sticks out from the rest of the face,
Carve it so that it does. So many many carved faces are too flat,
try to get some depth to the face, the eye cavities are really
quite deep, the cheeks, mouth and mustache are much farther back
than the tip of the nose.


 Pictures
#'s 8, 9 10.
Pictures
#'s 8, 9 10.
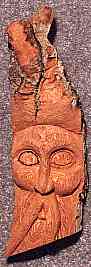
Draw lines to represent the tops of the eyebrows and the outlines of the eye mound. NOTE: THE EYE MOUND, NOT THE EYE. Opps, the forehead was drawn and carved in too low on the face, so what!! Just draw another squiggle a little higher and re-establish the forehead. Use the large V tool again to carve on top of the lines. Round the eye mounds with one of the sweep gouges or your whittling knife.
You can also work on rounding the mustache, cheeks and bottom lip. The beard area to the left, right and middle of the mustache is a fair bit lower than the mustache. The lip is below the mustache but not as low as the beard area. I hope this makes sense to you!!

 Picture
#'s 11, 12,13.
Picture
#'s 11, 12,13.
EYES NOW. Up to now we have just shaped the eye mounds, the eyes are found in the mounds. Draw a upper and lower eye lid over each eye mound. Then use the smaller V tool to cut these lines, carve the upper lid first. Now you should have what looks like rough eyeballs. Use the tip of your whittling knife to chip out a three sided chip from the left and right of each eye ball. The knife or one of the sweep gouges can be used to round and further define the eyeballs. If you turn the gouge over it will help to round features rather that scoop out bark fibre.
 Some
carvers will paint the eye pupil after shaping the eyeball, I
prefer to carve eye sockets. These can be placed on the top, left,
bottom or right sides of the eyeball, depends on the look you
want. On picture # 14, (left) the approximate location of the
eye sockets are drawn in with pencil. Make a gentle slightly angled
piercing cut with the tip of the whittling knife on the inside
of the lines drawn. Use one of the sweep gouges to clean out the
eye sockets. See picture # 15, (right) .
Some
carvers will paint the eye pupil after shaping the eyeball, I
prefer to carve eye sockets. These can be placed on the top, left,
bottom or right sides of the eyeball, depends on the look you
want. On picture # 14, (left) the approximate location of the
eye sockets are drawn in with pencil. Make a gentle slightly angled
piercing cut with the tip of the whittling knife on the inside
of the lines drawn. Use one of the sweep gouges to clean out the
eye sockets. See picture # 15, (right) .
Hey what's happened to the nose? Looks like someone has reduced the size of the original big blob nose. This can be done with the good old whittling knife combined with some rounding and shaping cuts with one of the sweep gouges, used both right side up and upside down.
You can also see on picture # 15, the start of hair texturing in the beard, mustache, eyebrows and head. Don't just use one tool to make straight hair lines. Hair will look better if you start with a gouge then use the larger V tool followed by some finer cuts with the small V tool. Curve these hair texturing cuts making different levels, and curved not straight lines.
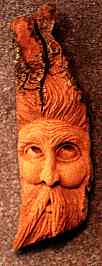 Picture
# 16, (left) shows the completed carving with some additional
wrinkle lines in the forehead and under the eyes. The nose has
been further shaped with small sweep gouges. Nostrils can be carved
with the smallest sweep gouge. Sanding can be done on the forehead,
cheeks, nose eyeballs and the lip.
Picture
# 16, (left) shows the completed carving with some additional
wrinkle lines in the forehead and under the eyes. The nose has
been further shaped with small sweep gouges. Nostrils can be carved
with the smallest sweep gouge. Sanding can be done on the forehead,
cheeks, nose eyeballs and the lip.
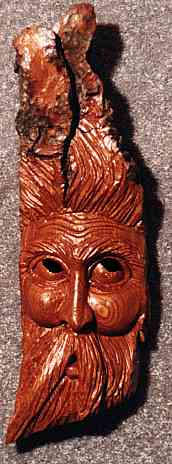 The varnished carving is picture
# 17 (right), finished on all surfaces with two coats of Benjamin
Moore, One hour low lustre varnish.
The varnished carving is picture
# 17 (right), finished on all surfaces with two coats of Benjamin
Moore, One hour low lustre varnish.
Just for fun, this carving is going to be shipped to our fearless editor, Bill Judt. I think it will hang in his carving studio, I have therefore called it , "Where's Bill ?"
![]()
5. REVIEW AND CONCLUSION.
The basic technique is to roughly sketch with a pencil the shape and approximate location of the desired feature, then carve around the feature and further define and shape it by carving away some of the nearby bark. Remember to sketch the initial features much larger than what you think the finished item might be. Rounding and shaping the features with your carving tools will reduce the sketched size. Eyes may be left as rounded mounds and paint can be used to highlite the pupils, or they can be carved in. Sanding is usually done on the smooth parts of the forehead, cheeks, nose and bottom lip. The hair, beard and the mustache are carved with sweep gouges and finished with "V" tools.
The completed carving is finished with at least two coats of a good low lustre varnish. If you like to use an oil based product, I like "Benjamin Moore; One Hour Low Lustre Clear Varnish ". There are also some very good water based varnishes, my favorites are; Delta Ceramcoat, satin and/or matte; also Jo Sonja's Matte Finishing varnish. The carving is completed by following the basic method you have just read about. Apply the same methods to the different features. Don't stop at one carving, analyse what you have done and keep on carving. Practice makes it better and more enjoyable. Start looking at faces with a different outlook than you have in the past, you may be surprised at the many new things that have always been there but you did not see before.
I wish you many years of happy carving.
![]()
I will write another article for the next issue. What will it be??
Please vote on your choice of article by email. The votes by the middle of March will decide. You vote I write. Neat, Hey. Please send me some email with your opinion of this article.
My email address is woodchuk@telusplanet.net
You are certainly welcome to visit my homepage at.