
 |
CHIP CARVING CORNER! with Jeff Fleisher |
First, I'd like to thank Dennis Moor for his recent visit to our carving club in Northern Virginia. Dennis was teaching a chip carving course at a nearby store and graciously came by the night before and spent about three hours with us. Dennis is a great storyteller and we had a wonderful time. If you ever have the opportunity to meet Dennis, just ask him how he got into the knife making business!
During the past couple of months I've been experimenting with alternative finishes for my carvings. I've been monitoring the threads on finishes in the WWWoodC@rving Listserve and the most recent article by Bob Ostmann in Chip Chats. Bob is a member of the Northern Virginia Carvers and I've seen his wonderful work. This month I thought I would discuss my experiences with three different finishing techniques.
I have been trying to teach myself woodworking to go along with my woodcarving. I built three jewelry boxes out of curly maple for the sides and a butternut panel top suitable for carving. I used double through dovetails for the joints. This type of dovetail has an eighth-inch piece of butternut in between the maple sides. This provides a nice contrast between the two woods. As you will see, it also provides an interesting problem to make the darker butternut standout against the end grain of the maple. The other interesting problem was to decide if I should carve the butternut panel top and partially finish it prior to putting the box together or should I build the box first and then carve and finish the piece.

I decided to build the box first and then apply the finish. I wanted to make sure the design was centered in the top panel and I felt more comfortable making the measurements knowing the box was together and wasn't going to change. Ok, now I have three unfinished maple and butternut jewelry boxes. What now?
I wanted to achieve the following:
1. A strong contrast between the butternut and maple woods.
2. Well-defined distinction between the chip carved areas and the background.
3. A professional looking surface – a nice glow.
4. A finish that will provide protection.
5. Easy to apply.
Here are the results of three different finishes. I'll walk through the application of each and then try to give an assessment of the pros and cons. Here goes..!
The first method is the quick and easy approach. I used spray semi-gloss polyurethane over the entire piece. I applied five coats following the directions on the can. After allowing it to dry completely, I applied a liquid Watco dark wax using 400 wet/dry sandpaper to give the surface a super smooth feel. Buff dry. I used the dark wax to try to darken the chipped areas enough to provide a contrast with the surface. Here is a picture of the finished product.
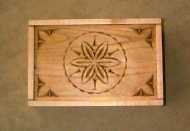
This finish is disappointing. The wax provided a dark crease at the bottom of the chips because it collected in the grooves of the chip cuts. The walls of the chips didn't accept very much of the dark wax so they look more 'dirty' than uniformly dark. This method was easy to apply but I would consider the results barely acceptable.
This method is the finish I use most often. It is also the finish that both Wayne Barton and Dennis Moor use. Here are the steps:
1. Apply spray polyurethane as a sealer for the top and as a final finish for the sides. I use 2 – 3 light coats on the butternut top and 4-5 coats on the maple sides. Allow to dry.
2. Lightly sand the butternut top surface being careful not to soften the sharp edges on the chip carving.
3. Apply a gel stain to the carved butternut. I use a one part dark brown mahogany mixed with four parts of clear. Brush the gel stain into the chip carved areas. Immediately wipe of surface and allow the stain to sit in the chipped areas for a few minutes. Brush the stain out of the carved areas using a dry brush and wipe the surface. Repeat until all the excess stain is removed.
4. Allow to dry.
5. Apply 3 more coats of spray polyurethane.
6. Apply Watco liquid wax that contains one part dark wax and one part natural. Using the 400 dry/wet sandpaper, sand the entire area. Buff dry.

This finish provides a nice contrast between the carved areas and the flat surround. The butternut takes on the brown tone of the stain without covering up the beautiful grain. The amount of dark stain absorbed into the chipped areas is very dependent on the amount of polyurethane sealer. I've had very good results and not-so-good results. If the spray sealer is too heavy, less stain is absorbed and less contrast is obtained. This is especially true with the chips that run parallel to the grain. The cross grain chips absorb more stain than the chips with the grain. I like this approach but feel I have very little control over the amount of stain that is absorbed by the wood.
This method Bob Ostmann discussed in Chip Chats. Bob discussed this method at a Northern Virgina Carvers club meeting and the finish I started out using a couple of years ago. I stopped using it awhile ago because I thought the spray vs liquid polyurethane would be easier to use. Let's see how it affects the final product! Here are the steps:
1. Apply liquid polyurethane as a sealer for the top and as a final finish for the sides. Dilute the polyurethane using one part mineral spirits and four parts polyurethane. Allow to dry.
2. Lightly sand the butternut top surface being careful not to soften the sharp edges on the chip carving.
3. Apply a gel stain to the carved butternut. I use a one part dark brown mahogany mixed with four parts of clear. Brush the gel stain into the chip carved areas. Immediately wipe of surface and allow the stain to sit in the chipped areas for a few minutes. Brush the stain out of the carved areas using a dry brush and wipe the surface. Repeat until all the excess stain is removed.
4. Allow to dry.
5. Apply 2 more coats of liquid polyurethane.
6. Apply Watco liquid wax that contains one part dark wax and one part natural. Using the 400 dry/wet sandpaper, sand the entire area. Buff dry.

This finish provides a very nice contrast between the carved areas and the flat surround. The butternut takes on a very rich brown tone of the stain without covering up the beautiful grain. The amount of dark stain absorbed into the chipped areas is much more uniform than in either of the other two methods. The cross grain chips still absorb more stain than the chips with the grain but it is still a much more pleasing look. It seems like that I had more controll over the dark stain and its ability to darken the chipped areas with this method. Their is definately a time - darkness relationship. The longer the stain stayed on the surface before being brushed out, the darker the chipped area became. I didn't seem to have this control on the other methods.
This proved to be a very interesting exercise. I would recommend this type of experimentation on your carvings and would be interested in hearing the results. From my discussion, you can see that I liked method 3's results the best. The pictures don't do it justice, but the rich tone was markedly better than the other two approaches. Is it the ultimate finish. Well, I'm still looking! Please let me know what you use and how you like the results. Try these methods and compare.
