Volume 2, Issue 6
Volume 2, Issue 6
Woodcarver Ezine
Back Issues
Carvers' Companion Gateway
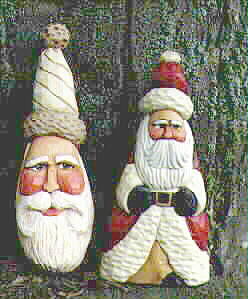
Buddies #264
A Tina Toney Design
Materials List:
A good wood carving glove, Vet-Wrap, thumb guards or Band-Aids to prewrap. A good carving knife, a set of Standard Sized Palm Chisels and an optional item, a "Gripster" or Excel Cushioned Handle (hobby knife) for #11 Testor's blades. A non-slip mat for your work surface.
Acrylic Paints:
White, Off White, Wicker (Accent)
Black, Avalon Blue, Medium and Caucasian Flesh, Golden Brown
Burnt Sienna (Delta)
DeLanes Cheek color DA182, Toffee, Graphite, Black Plum
Above row is (Americana)
Liquitex Naphthol Crimson and Jo Sonja's Rich
Gold
Designs From The Heart Wood Sealer
Jo Sonja's Matte Finish Varnish, Jo Sonja's Antiquing and Retarding
Medium
Trewax Floor Paste Wax in Clear
264 Buddies
Begin by transferring the design onto the cone shaped Santa. Round off the corners of the cutout to start. Use your v-tool to stop cut on the arm lines, hat lines and belt lines. I see a boo boo in the drawing on the pattern where the belt buckle is located. Draw the buckle as indicated in the photo. A shallow v-tool stop cut on the buckle and belt is recommended.
V-tool stop cut the wood around the back side of the sleeves and cuffs, then around the mittens and back up to the shoulders. Relieve enough wood under and behind the arms to allow them to protrude. Allow enough wood just under the arm to remain for the pockets to protrude. A wide u gouge dishes under the pockets. Continue by relieving the wood forward and behind the top of the hat as well as lower on the hat.
Remove wood at the top of the hairline where it meets the fur trim of the hat. This will allow the fur trim to protrude over the hair. Also across the back just below the hair. Slightly indent the belt to give it the appearance of cinching in the waist. Remove wood on undergarment in front to a lower level that the fur trim of coat. Use a v tool to divide the foot from the clothing and shape it. Remove enough wood on the coat to allow the coats fur trim at the arms and lower portions to make the fur trim protrude. Shape the mittens and belt in front.
Stop cut using a U gouge under the nose pushing the gouge straight into the wood. Remove a minute amount of wood beneath the nose. Use a U gouge across the eye area being careful to leave the eyebrow lines intact. Use a small v tool to stop cut around the cheeks up to the nose and hairline. Remove enough wood on the cheeks to allow the nose to protrude and shape a slope up to the eye area. Remember the eyes are lower than the middle of the nose between them. So don't fear to lower the eyes now. Draw the eyebrows and remove wood above them to allow them to protrude. Finalize the face area by removing any corners from stop cuts around the hairline/cheekline.
Use the v-tool to stop cut around the mustache. Remove beard wood to allow the mustache to protrude. Using the v tool, detail the mustache and beard. Use a U-gouge to detail the fur trim, seal your piece with a sealer such as Designs From The Heart Wood Sealer prior to painting.
Santa ornament, round off all corners and shape hat prior to drawing pattern. Then proceed to carve it according to the face carving directions above.
Painting
Faces: Washes of Medium and Caucasian Flesh with Cheek Color DA182
Eyes: Avalon Blue, Black pupil white highlight
Beards: Off White
Clothing: Ornament Santa Toffee and Wicker Cone Shaped Santa: Naphthol Crimson with Black Plum shading. Golden Brown undergarment. Graphite Mittens. Black Belt with Rich Gold buckle.
Antique: Both antiqued with Burnt Sienna & JS Antiq. & Retarding Medium, waxed with clear Trewax.
ENJOY!