
by Thierry Varem-Sanders
wood-art@telus.netEditor's Note: I first met the gregarious Thierry V-S at the Red Deer (Alberta, Canada) summer Woodcarving Seminar last year, and discovered very quickly that he is not only an enthusiastic woodcarver and a talented computer wizard-programmer but also an inventor of some repute. Thus I am pleased and proud to present to you his ingenious
"Air Curtain".

I have been carving for a few years now, and carve with power tools as well as knives/gouges. Power carving has many advantages, particularly in removing large amounts of waste wood. It also has some disadvantages, the most frustrating of which is dealing with the wood dust.
No matter what kind of wood you carve, the dust is harmful to your lungs. In the worst case, the dust of some woods can be outright poisonous, or can cause allergic reactions. Not only is this dust unhealthy, but it also floats through the air... around the room... throughout the house... slowly covering everything in its path. This is usually not harmful, depending on the patience of your spouse, but it is at least irritating to complete an honest day's carving only to be presented with a dust rag and an ultimatum.
I tried wearing a dust mask, but that didn't prevent the dust from covering my hair, and later falling into my eyes. I also found it more difficult to clear the dust from the carving, something I had previously done by blowing it away . Furthermore, it didn't solve the dust migration problem.
I also tried leaving my vacuum turned on with the outlet next to my work. That worked better, but a lot of dist simply didn't make it into the vacuum hose, and I nearly went deaf with the noise.
I tried shopping for commercial dust control systems, and soon discovered that even a simple fan and filter system started at US $300. More effective systems such as a downdraft table were as expensive as US $2000.
Like many other carvers, I am not afraid to build something myself if it will make my life easier, particularly if it also keeps me out of the poorhouse. I therefore decided to design and build my own dust handling system. I also felt that the design should at least include the following features:
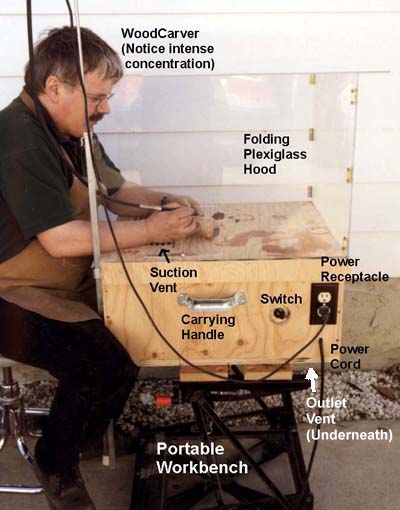
It took a bit of trial and error, but I finally came up with a very workable design (see the above picture). Not only does it work, but it exceeds all of my expectations.
The basic unit is a wooden box with a hinged lid (to access the filter and fan). The box is built out of 3/4 inch spruce plywood. I used a thicker plywood because that allowed me to fit it together without using an internal frame, and so that the final work surface would be solid and rugged enough to sustain abuse from a hammer, mallet etc. The final work surface is 24 by 24 inches, which I have found more than sufficient for small to medium carving projects. The hight of the box is only 11 inches and was largely determined by the size of the fan and filter within.
The clear plexiglass hood helps to contain all the wood dust produced from carving or sanding, yet still admits full light to the entire work area. The sides are hinged, and the top is lightly attached with velcro; thus the entire hood folds into a convenient flat package. This hood is necessary to the design; it is this hood that allows me to work without a dust mask.

Clearly, the box isn't tall enough by itself, so I fit it to a B&D portable bench. Note that I do not favor any particular brand of portable workbench. The workstation can fit any portable workbench with a large bench clamp at the top. There is a 2 X 2 attached to the bottom of the box (see picture above) which allows the workstation to fit into the clamp. To reenforce this , it is also synched to the frame of the bench using commonly available hardware.
The side of the box contains a power receptacle to reduce the need for extension chords. Also included is a handle to improve the handling of the bench.
The discharge vent points straight down, primarily for convenience. Virtually any other direction would end up directing a windstorm to neighbors or onlookers in a carving show.
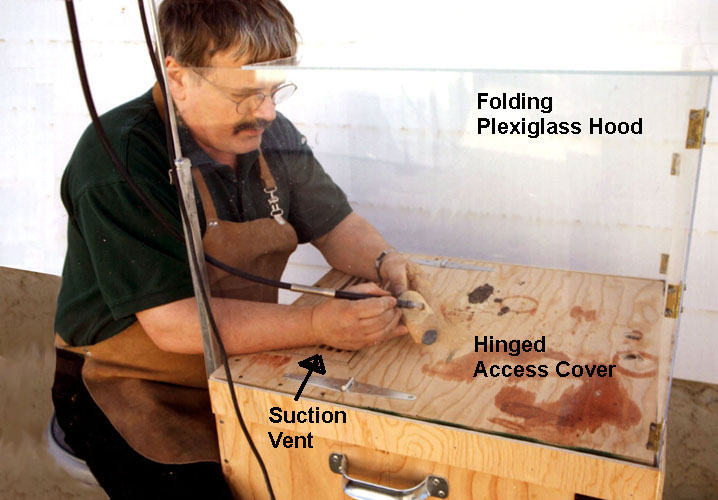
You will notice that the suction vent is mounted at the front of the workstation (see the closeup picture) rather than in the middle or the back, as in traditional small dust collectors or downdraft tables.
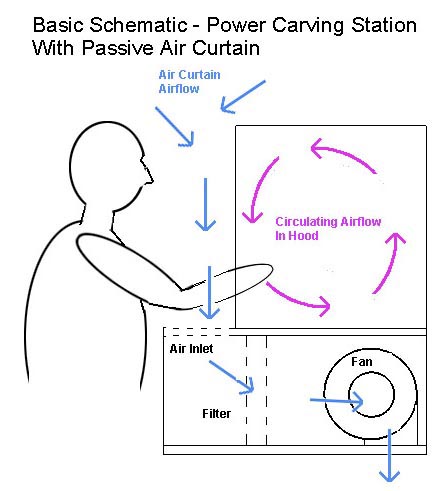
Dust is carried into an airflow by the speed of the air. With the vent at the front of the workstation, a passive air curtain is created between the opening of the plexiglass hood and the body of the person facing the hood (see the schematic). This air curtain has a much higher airflow because it is restricted to a narrower stream than if the vent was inside the hood.
Moreover, the carving does not need to be placed next to the vent for the dust to be captured. Dust produced anywhere in the hood can only escape through the air curtain (and down to the filters). Compared to the alternate vent locations, this produces the fastest and most efficient air stream for the minimum power requirements. This reduces the cost of the fan, the cost of operation, and the noise level, and reduces or eliminates the need of a dust mask..
The air curtain also creates a complementary air circulation inside the hood. Because of this circulation, a substantial amount of heavier dust is swept to the back of the hood (away from the vent - no kidding) and settles out on the surface of the workbench, where it can be vacuumed up later. Because of this effect, less dust goes down the vent, extending the life of the filter.
The air curtain could be enhanced even further if I were to redirect some of the discharge air to a small vent facing down at the front of the hood. However, this would make the entire bench less portable. However, it is a consideration if one were to build a full-sized fixed bench.
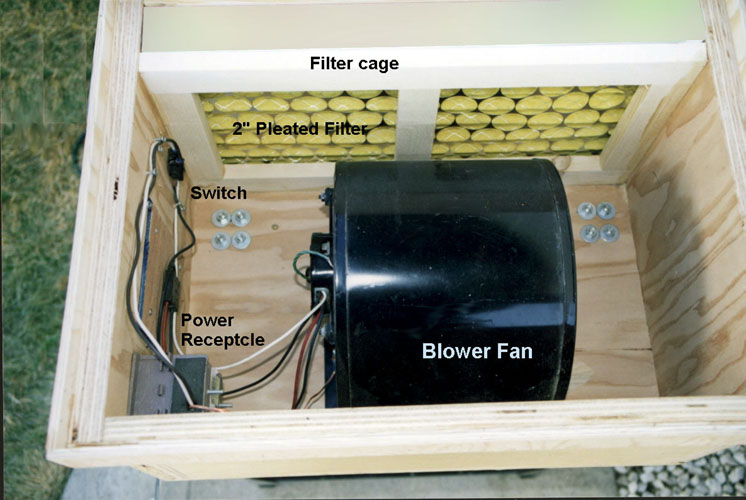
The fan is by far the most expensive component of the workstation. I highly recommend acquiring the fan at a second-hand store or garage sale. I acquired mine at a yard sale for US $10. It is a blower fan (also called centrifugal fan) with a 3 speed control switch, and a direct drive 1/25 hp direct drive motor (see detail of interior of the workstation). The air flow varies from 50 cubic feet per minute (CFM) to 300 CFM (estimated). This air flow is efficient enough that I only use the medium speed setting unless I am using a kutzall TM burr.
Blower/centrifugal fans are fairly efficient at maintaining a good air flow even when the air stream is restricted by an air filter. Fortunately, these can be easily found in second hand shops because their primary usage is in furnaces and ventilation systems. They can easily be found with air flow ratings ranging from 150 CFM to 1000 CFM. Talk to a furnace repairman. They often sell used blowers cheap in the fall.
A more efficient (but more expensive and difficult to find) fan is a "backward-curved centrifugal" type. These are often used in commercial dust control systems.
One other fan to consider is an "axial" fan. These can be found with fairly high air flow ratings but this air flow is reduced very significantly if a filter is placed inline. However, I saw some rated at 450 CFM at a used hardware dealer (Princess Auto) for only US $35. These may be sufficiently powerful, but you would have to try them first.
If the fan is the most expensive component, the filter is the most important one. It is important that the filter is both efficient and does not impede the air flow significantly. Do not use household furnace filters. These are simply not efficient enough to capture the most dangerous smaller dust particles.
I use a 2" thick pleated filter. These filters are considered medium efficiency filters, but they are more than sufficient to remove fine particles down to a few microns. Furthermore, they are reuseable when used with wood dust. I simply take the filter outside and tap it against the ground to knock out any sawdust collected. How often this needs to be done depends on the activity, but it will be sufficient for several hours. These filters can't be used forever. After about 3 to six months, the filter should be replaced.
Because the size of the filter cage in my workstation is non-standard, I had to have my filters custom made. However, they are relatively inexpensive for an item that lasts several months. I buy them for US $5.
One other concern with pleated filters is that larger particles can potentially pierce the filters. To deal with this, I installed a bag (made of aluminum window screen) just inside the suction vent. Not only does this capture larger particles and chips, but it is an excellent trap for capturing small rotary bits. I simply retrieve them with a magnet.
I initially built this system as an experiment, and was not sure how well it would work. I tested it rigorously for an entire evening. I tried lightly grinding on a piece of cedar with a large diamond burr. This produced a lot of fine dust, enough to cover the workbench with a layer of fine dust. I, on the other hand, did not breath in any dust of any kind ( I know this for a fact, because I do react quite unfavorably to cedar dust). Furthermore, I didn't even have to dust off my clothes.
I tried a little more rigorous test, grinding on the same cedar using a 1/4 inch kutzall burr. After ten minutes of grinding, the entire interior of the workstation was loaded with dust. However, again, I didn't breath any in, the air flow was still good, and the filter wasn't clogged.
This system works so well that I am going to design a larger system for my main workbench.
Enjoy:-)
Thierry Varem-Sanders