
(The following article originally appeared in The Log, the newsletter of the California Carvers Guild. Thanks to Bob Travis for permission to reprint the article in WOM. Thanks also to Gordon Paterson for providing the text and graphics.)
Harold's technique will add life to your carving.
This discussion pertains to carving long flowing hair that might
be found on a mountain man or on a woman, but it will work equally
well on short hair and/or beards and mustaches. A V-tool is often
the tool of choice; however, a deep U-gouge will also work. The
U-gouge will give a softer look and is especially effective on
woman's hair. If you use a U-gouge, experiment with different
sizes. A small U-gouge (the size depends on the size of the carving)
will result in a busy look. Harold didn't say this but more experienced
carvers do not mix V-and U-cuts on the same piece.
-
FOUR STEPS TO CARVING HAIR
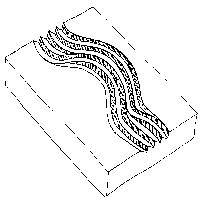
 1. Make long sweeping S-cuts (Fig. 1). A common
mistake when carving hair is the use of long straight cuts. Try
to avoid this approach. With sweeping S-cuts your carving will
take on much more character. Make the direction change in your
S-cuts severe. Start by drawing an S on your carving. If it doesn't
look like an S then the lines are too straight.
1. Make long sweeping S-cuts (Fig. 1). A common
mistake when carving hair is the use of long straight cuts. Try
to avoid this approach. With sweeping S-cuts your carving will
take on much more character. Make the direction change in your
S-cuts severe. Start by drawing an S on your carving. If it doesn't
look like an S then the lines are too straight.
Fig. 1. Parallel or serpentine cuts.
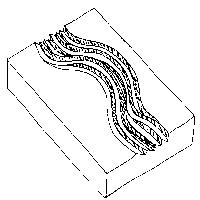
 2. Change lanes periodically
(Fig. 2). Pretend you are on a freeway during rush hour. Begin
your S-cut adjacent to a previous cut then, after a short distance,
merge into the previous cut. Use this technique frequently to
add interest to your carving. Be careful not to create a repeating
pattern when merging cuts.
2. Change lanes periodically
(Fig. 2). Pretend you are on a freeway during rush hour. Begin
your S-cut adjacent to a previous cut then, after a short distance,
merge into the previous cut. Use this technique frequently to
add interest to your carving. Be careful not to create a repeating
pattern when merging cuts.
Fig. 2. Changing lanes.
 3. Begin some cuts
between previous cuts (Fig. 3). For example, when carving long
flowing hair use the above techniques first. Start your long sweeping
S-cuts at the bottom and work toward the top. After you have four
or five cuts, with some lane changing, start a new cut between
two previous cuts. You can incorporate lane changing with these
cuts as well. Repeat this process as needed with successive cuts
beginning nearer the bottom or closer the top. Avoid making a
repeating pattern.
3. Begin some cuts
between previous cuts (Fig. 3). For example, when carving long
flowing hair use the above techniques first. Start your long sweeping
S-cuts at the bottom and work toward the top. After you have four
or five cuts, with some lane changing, start a new cut between
two previous cuts. You can incorporate lane changing with these
cuts as well. Repeat this process as needed with successive cuts
beginning nearer the bottom or closer the top. Avoid making a
repeating pattern.
Fig. 3. Begin between previous cuts.
 4. Deepen some areas
(Fig. 4). After you have carved most or all of the hair using
the above techniques, go back over some areas to deepen the flow.
This will create locks in the hair. WARNING: Be careful not to
develop a distinct pattern when doing this. Random placement of
the deepened areas will make it look more natural. Also, be sure
to carve the entire surface. Try to remove all flat spots between
hair strands.
4. Deepen some areas
(Fig. 4). After you have carved most or all of the hair using
the above techniques, go back over some areas to deepen the flow.
This will create locks in the hair. WARNING: Be careful not to
develop a distinct pattern when doing this. Random placement of
the deepened areas will make it look more natural. Also, be sure
to carve the entire surface. Try to remove all flat spots between
hair strands.
Fig. 4. Deepen some areas.
Once you master the above tips you will probably
be quite happy with the results. But if you want to attain spectacular
results, you might try Harold's method for carving spiral curls
(see photo).
 The idea for this
article developed during a session with Harold on a trip to Sacramento.
As he was demonstrating the steps, I became aware that there is
a lot more to this than just making a series of deep V- or U-cuts.
Harold uses his entire upper torso when he carves hair. His style
is difficult to explain without photographs, but I'll give it
a try. Grip the tool in your carving hand by wrapping all four
fingers around the shaft. Place your thumb on the carving and
anchor it in place with your other thumb. This allows you to control
the tool. As you push the tool through the wood rotate it from
side to side by rotating your wrist. If you are right-handed,
rotate your wrist down to the left when swinging the S-cut to
the left. Accomplish this by elevating the knuckle of your pinkie
finger and raising your elbow. Rotate your wrist up to the right,
drop your pinkie knuckle and elbow when swinging to cut to the
right. Lefties just reverse the process.
The idea for this
article developed during a session with Harold on a trip to Sacramento.
As he was demonstrating the steps, I became aware that there is
a lot more to this than just making a series of deep V- or U-cuts.
Harold uses his entire upper torso when he carves hair. His style
is difficult to explain without photographs, but I'll give it
a try. Grip the tool in your carving hand by wrapping all four
fingers around the shaft. Place your thumb on the carving and
anchor it in place with your other thumb. This allows you to control
the tool. As you push the tool through the wood rotate it from
side to side by rotating your wrist. If you are right-handed,
rotate your wrist down to the left when swinging the S-cut to
the left. Accomplish this by elevating the knuckle of your pinkie
finger and raising your elbow. Rotate your wrist up to the right,
drop your pinkie knuckle and elbow when swinging to cut to the
right. Lefties just reverse the process.
As mentioned earlier, Harold uses his entire upper torso when
making these cuts. The elbow and shoulder of the carving arm should
be free to rotate. If you lock your arm in place, you will greatly
restrict the flow of the cuts. The arm holding the carving should
also be free to rotate. This will give you freedom of a full 360
degrees of movement. If you are working on a piece clamped in
place, rotate your entire upper body to attain the same result.
Think of yourself as an artist holding a paint brush. An artist
will generally use the entire arm in forming brush strokes.
The best thing you can do is practice. Round off the top of a
stick and try Harold's system. His technique works best with both
realistic and caricature carvings. When I first tried this I found
it difficult to control the tool. Prior to using his system I
would lock my hand into place by placing my forefinger on the
carving. The problem here is that this restrict mobility, making
it nearly impossible to rotate the tool or the carving. After
a couple of hours it began to feel natural. The results are astonishing.
Give it a try.