
In the spring of 2000 I took a two-week woodworking class at the North Bennett Street School in Boston, MA. I wanted to improve my woodworking skills so that I would not have to rely on catalog or store-purchased items to chip carve. Chip carving is a form of carving used to decorate the surface of an object such as plates, boxes, bowls, and furniture. I had been a self-taught woodworker and have made a number of jewelry boxes, humidors, a baby crib, but never really 'knew what I was doing'! I returned to Virginia after the class with the confidence (and naiveté !) to want to do something BIG.
Since I really like the Arts & Crafts style of furniture, because it has a lot of surface area for potential carving, I started looking at my books and magazines to get an idea. It was there that the Grandfathers Clock jumped out at me. It is a traditional style that provided a variety of surfaces that could be enhanced with chip carving. Although Arts & Crafts style is known for it's plain lines, I thought that the traditional elegance of chip carving would blend well with the lines of the clock.
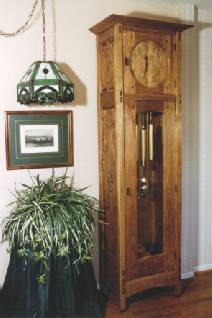 Left: The finished
product in our family room. The clock measures about 84"
tall and 24" wide. The main body of the clock is made from
Butternut and the face is Birch. Not traditional Arts & Crafts
style wood but something that I thought I could chip carve (more
on that later!!)
Left: The finished
product in our family room. The clock measures about 84"
tall and 24" wide. The main body of the clock is made from
Butternut and the face is Birch. Not traditional Arts & Crafts
style wood but something that I thought I could chip carve (more
on that later!!)
Carvings on the clock include two panels on
each side of the case, the clock face, a drawer front on the inside
bottom of the clock and a couple of plaques on the inside of the
case.
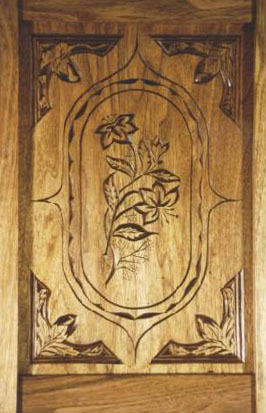 The top side panel.
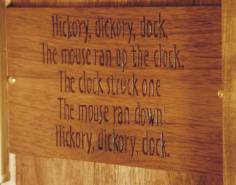 On the inside of the
clock I put a plaque with the "Hickory, Dickory, Dock"
baby lullaby.
On the inside of the
clock I put a plaque with the "Hickory, Dickory, Dock"
baby lullaby.
If you look closely at the top panel, you can see a mouse in one of the corners getting ready 'run down' the clock. The mouse is in the bottom corner on the top panel on the other side of the clock getting ready to 'run up' the clock.

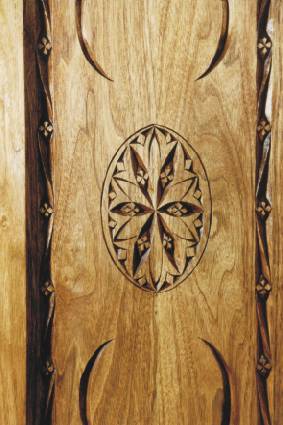
The bottom side panel. It is rather long so the left-hand figure shows the top half of the panel and the right one shows a close up. The panel is symmetrical.
 Finally, the last item that I carved
was the face. I originally purchased a face when I bought the
clock mechanism but I didn't feel right putting a painted face
in a carved clock. Therefore, I decided to carve the face also.
I had some birch lying around my shop so I glued up a panel and
laid out a face design. Everything went great until I started
to chip carve the birch. I did not realize how 'hard' a wood birch
is until I tried to stick a knife into it! Of course, who tries
to practice on a piece of scrap beforehand! Well, after much consternation,
a sore hand and arm, and a few choice words, the face was done.
The clock was finished!
Finally, the last item that I carved
was the face. I originally purchased a face when I bought the
clock mechanism but I didn't feel right putting a painted face
in a carved clock. Therefore, I decided to carve the face also.
I had some birch lying around my shop so I glued up a panel and
laid out a face design. Everything went great until I started
to chip carve the birch. I did not realize how 'hard' a wood birch
is until I tried to stick a knife into it! Of course, who tries
to practice on a piece of scrap beforehand! Well, after much consternation,
a sore hand and arm, and a few choice words, the face was done.
The clock was finished!
 I entered the clock
in the carving show hosted by my carving club here in Northern
Virginia, the Northern Virginia Carvers, and I was
lucky enough to win first place in the chip carving category,
Best in Class (Advanced), Best in Show, and, to my surprise, the
People's Choice Award.
I entered the clock
in the carving show hosted by my carving club here in Northern
Virginia, the Northern Virginia Carvers, and I was
lucky enough to win first place in the chip carving category,
Best in Class (Advanced), Best in Show, and, to my surprise, the
People's Choice Award.
All-in-all, this project really tested my new found woodworking skills and was also quite a chip carving project. I recently finished a Blanket Chest that is made out of Red Oak, Mahogany, and cedar. The chest includes five chip carved mahogany panels. I'll write about that project in a future issue of Woodcarver Online Magazine.
--Jeff
Jeff Fleisher is a long-time chip carver who has appeared in previous issues of WOM. You may email Jeff at CHPCRVR@aol.com, or visit his web site at http://members.aol.com/_ht_a/chpcrvr/index.htm